This morning a nice surprise awaited me in our Openbravo 3 test environment: Linked Items was added overnight and it works like a charm! This feature sits in a section in the form view and contains a list of all items that are related in the database. This is ultra handy of course if you - for example - quickly want to view all purchase invoices for a certain vendor or find all shipments for a certain product. A simple click on an item in the right column in the Linked Items grid launches the item on a new tab. This feature will be part of Openbravo 3 release candidate 4 which will be available mid February.
A Great Community Contribution: Linked Items
Monday, February 7, 2011
Posted by Rob Goris at 1:52 PM 0 comments
Labels: community
Testing Yammer, Chatter and Teambox
Monday, January 31, 2011
Every couple of weeks I take the train from Barcelona to Pamplona. It is a four hour journey and although it seems quite long, I always enjoy the ride. Being offline lets me work without distractions on the more creative kind of stuff such as designing product features or writing blog posts. Or I just relax and listen to my iPod while watching the landscape blast by through the window.
A few days ago I was on my way to Pamplona once again and - following my ritual - after exactly 2 hours I decided to go for a coffee in the train cafeteria. While I got up from my seat, I noticed my colleague Xavi sitting right behind me! What a coincidence and how silly that I did not know he was (going to be) there. Using Facebook and Twitter, I know about the whereabouts and plans of many of my friends but I don´t always know what my colleagues are up to. So Xavi and I went for a coffee and donut and spent the following two hours talking about things that he and I were doing at the moment. We realized that our work activities have a lot of dependencies and that it would be good to know more about what other teams are doing. However, this is easier said than solved. The first problem is that none of us is really keen on planning meetings just to exchange information. The second problem is that many of us are geographically dispersed. Openbravo has staff in seven countries.
Would an internal social media application help to improve cross-departmental communication?
In the next few weeks a couple of colleagues and I will test Yammer, Chatter and Teambox. Actually we started this morning already with a couple of updates and I just learned that I have to bring back a tennis racquet to Barcelona this week when I return from the Pamplona office :-)
Thinking ahead, the next step could be to place one of these apps in an Openbravo Workspace Widget so you can use it directly from within Openbravo 3. Imagine how cool it would be to place links to Openbravo documents in status updates, such as "Jorge just received payment against invoice INV/010010". You would then just click that link and the document opens on a new tab.
Share your thoughts on the UX Lab forum.
Posted by Rob Goris at 10:09 AM 4 comments
Labels: communication
Get your widget packaged in RC4
Thursday, January 13, 2011
Openbravo 3.0 offers customizable widgets that you can add to your workspace. In RC1 and RC2 we gave you static content, in RC3 we let you create simple widgets by pulling content from a URL.
For RC4 we will introduce two more types of widgets: HTML and Query widgets. This is were things get really exciting. The HTML Widget allows you to embed html code and the Query Widget lets you define a HQL Query with the columns to be shown. Here are two (real) examples, taken from a test server.
It does not take a lot of imagination to get an idea of the endless possibilities these widgets have. To give our users a glimpse of things to be had, we plan to include a set of cool widgets in Release Candidate 4. These would be role based so a sales person would e.g. get a widget showing the top 10 best customers by invoice amount and a finance person would see a pending invoices widget.
Now, we would like to ask you share your widget with us. The most useful (or coolest :-)) widgets will be packaged in RC4 so the whole world can enjoy them. You can either package them as a module and publish them on the Central Repository or just share the URL, code snippet or HQL query with us so we can paste them in.
You can share your ideas on the UX Lab forum. Bring them on!
Notes
- Download this document to learn how to create Query and HTML widgets. Refer to the earlier How to Create Simple Widgets for the first steps on creating a simple URL widget.
- RC4 is due for mid February 2011. Until that time, you can download the Query and HTML widget as modules to install on RC3.
- To facilitate working with HQL (e.g. testing your HQL before pasting it in a widget) you can download and install the handy HQL Query Tool
Posted by Rob Goris at 4:04 PM 0 comments
How to create an Openbravo Workspace Widget
Thursday, December 2, 2010
In my last blog post, I presented you with 24 ideas for Openbravo Workspace Widgets but I have to admit that these images were a bit of a tease, using smoke & mirrors in Photoshop. So now let´s put the money where our mouth is and build them for real with the step-by-step guide below that shows you how to create a simple widget for the Openbravo Workspace.
Before you start, make sure you are running Openbravo 3.0 - RC3 (release notes here) in Firefox and that your are logged in as a System Administrator.
You will be able to build your own widget in less than 5 minutes and share them with your team. If you also want to register and publish your widgets as a module, see Appendix II in the guide.
Share your experiences on the UX Labs forum. Here you will also find some source URLs for a number of widgets: Calendar, Motion Chart, Google Insights & Google Docs. Just copy & paste this in your widget definition. Add yours if you find some nice ones.
Posted by Rob Goris at 4:06 PM 3 comments
Labels: data visualization, interaction design
24 Ideas for Openbravo Workspace Widgets
Wednesday, December 1, 2010
With Release Candidate 3 (RC3) we are one step closer to delivering the promise of Openbravo 3.0. In this blog post I want to focus on the most important change in RC3: Fully functional Workspace Widgets. I will give you 24 examples of all the cool things you can do with them.

In RC1 and RC2 the MyOpenbravo tab (from now on called: Workspace) already featured a set of static "fake" widgets that served as a preview of the real thing. In RC3, we have rebuilt them as components that are defined in the Application Dictionary and can be packaged as modules. This means that from now on you can start designing, developing and deploying widgets and share them with your team, company or the world. We will get you started with a set of out-of-the-box widgets but the real interesting ones will be developed by our community. Although our audience is different and smaller in volume than that for the iPhone or Android App Stores, I can´t help believing in a similar burst of creativity for our Openbravo Workspace Widgets. Everybody to whom I explained the concept of Workspace Widgets in the last months, instantly came up with amazing ideas, whether they be productivity enhancing, insight providing, process streamlining or just fun.
Through this blog post I want to get the creative juices flowing so here´s a bunch of raw ideas for Openbravo Workspace Widgets. Leave your comments below the images.
I am very excited to learn what you will come up with. Start building widgets now or first share your ideas here.
In a few days I will explain how to create a simple widget. [ update: here it is ]
Posted by Rob Goris at 6:19 PM 2 comments
Labels: data visualization, interaction design
Why Hybrid Selection is the right Selection Method for Grids
Monday, November 15, 2010
Openbravo 3.0 release candidate 4 introduces an entire new interaction paradigm for document manipulation. Using a multi-level master-detail page layout it will be possible to view parent and child records, in either grid or form view, simultaneously. Both forms and grids have been redesigned as well and are optimized for the full document life cycle: creating, editing, processing, searching and comparing. One of the most dramatic differences with Openbravo 2.50 is that these tasks now can be done for multiple documents at a time through the multi-tabs GUI, in-grid editing and multiple objects selection in grids. In this article, I´d like to tell you about the different methods for object selection in grids and which method works best for our grids.
Grids consist of rows and columns. Each row represents a record and each column represents an attribute of that record. A single select in a grid is simply done by clicking on a row. The row will be selected and the screen will update all related information (e.g. children) to the selection. It is common to highlight the row to give the user a visual cue of what is selected. Multiple, discontinuous rows can be selected using a CTRL- (Windows) or CMD- (Mac) click combination. Multiple, continuous rows can be selected using a SHIFT-click combination. A combination of the above is possible using these key-click combinations but this is not recommendable as it is very easy to lose the selected set by clicking or pressing wrongly by mistake. This is especially the case when the selected set is out of sight because of vertical scrolling.
This is where the use of check-boxes comes in handy. Traditionally the preferred choice for multiple selection, they became "out of fashion" in the last decade in favor of other multiple selection methods. Now they´re back and we want to use them in a way that combines different selection methods:
Object Selection: The simplest method of direct selection: The user selects one object and manipulates it directly. For example, you select a folder (icon) and drag it into the trash bin on your desktop. This was quite a revolution in 1984 when Apple introduced their first graphical user interface. Command line interfaces (the standard at that time) used an indirect way of manipulation where you first had to define the action and then point to the object, e.g. deltree c:\myfolder.
Object Selection in early Mac OS

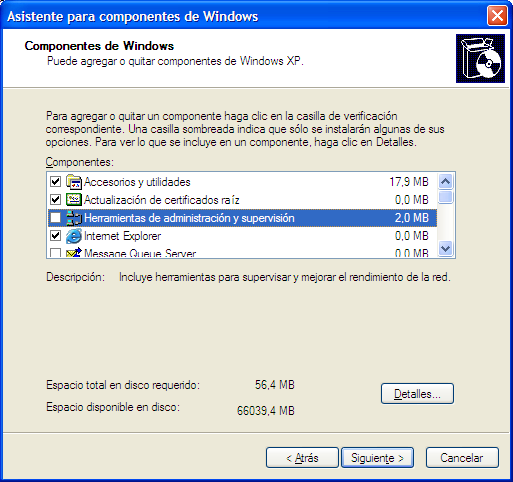
An example of toggled selection can be found in Windows XP in the Add or Remove Windows components dialog. Only the objects that are ticked will be added/removed, not the highlighted row.
Toggled Selection in Windows XP
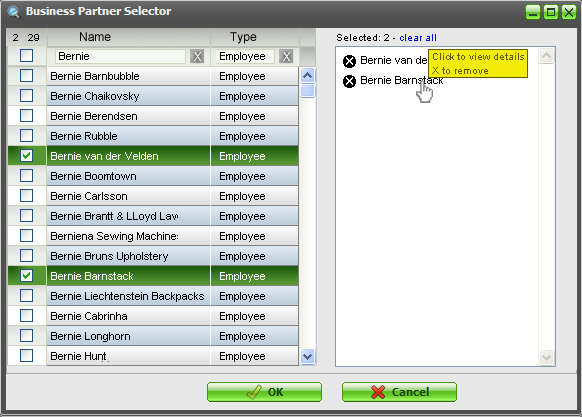
Collected Selection: This concept revolves around placing and accumulating selected objects in a separate bucket. In large lists or lists that span multiple pages, this is an easy way to see which objects already have been selected. We intend to use this for the multiple objects selector that has been discussed earlier.
Multiple Objects Selector concept using Collected Selection
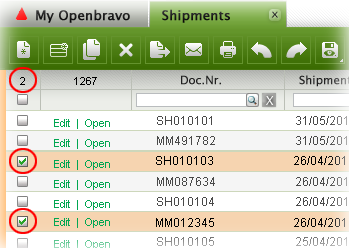
From a usability point of view, this method would also be appropriate in grid selection but less so from a practical (space) point of view. In the 3.0 grids, we will use a snippet of the collected selection method though, by displaying the amount of objects selected in the top left of the grid.
Selection counter
Hybrid Selection: This is a combination of Toggled Selection and Object Selection. This is what we will use for the Openbravo 3.0 grids. In most cases, the user will select one object only, view its children, edit its attributes and apply a process to it. This is object selection. In other cases, the user wants to select multiple objects in a grid via toggled selection. This is where the rows get checked.
Single row selected via Object Selection
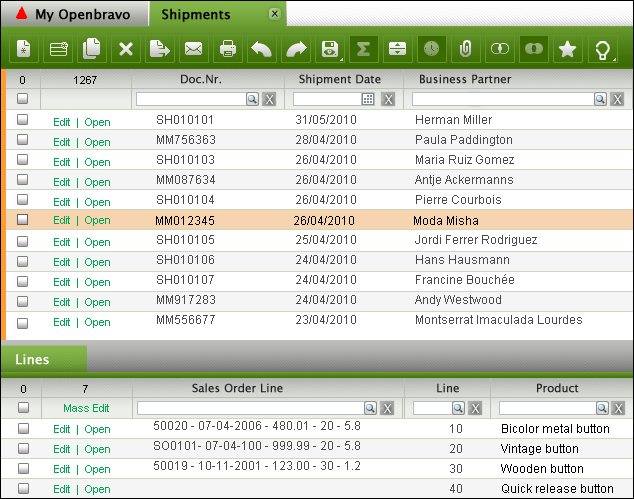
Single row selected via Toggled Selection
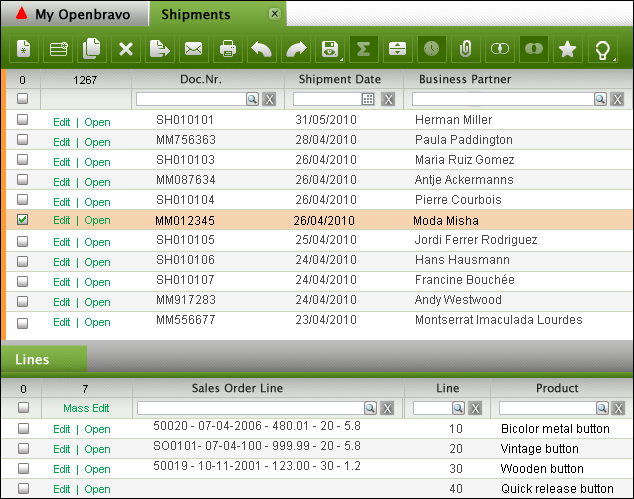
Multiple rows selected via Toggled Selection
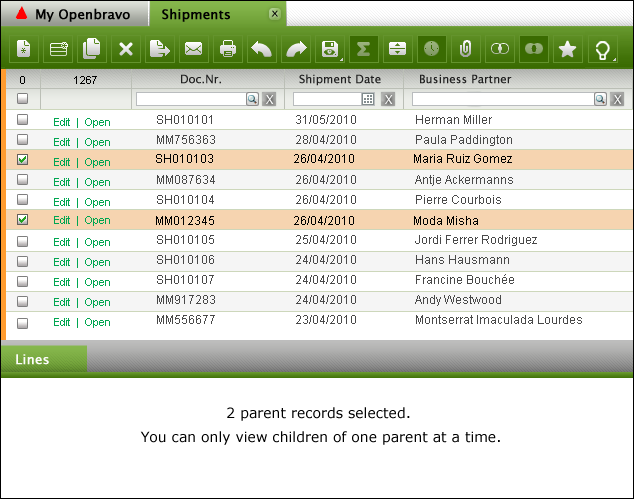
Hybrid Selection recombines the best of three worlds resulting in more efficient document manipulation and lower error rates.
Posted by Rob Goris at 11:23 AM 2 comments
Labels: interaction design
UX Storytellers: My Story about Wet Cats and Openbravo
Saturday, November 6, 2010
A while ago I was invited to write a story related to the User Experience domain in order to publish it in a book together with stories of other user experience professionals from around the world. Although I am still alive :-) I felt flattered to write my "mémoirs" and grabbed the opportunity to share what I have learned in my career. The book ‘UX Storytellers - Connecting the Dots’ is now ready.
The hard copy will ship in January. For now, there is a free PDF download
‘The Wet Cat’ can be found on page 542 (Scribd) or page 571 (PDF)
Posted by Rob Goris at 8:04 PM 1 comments


